Quick Setup (reduced functionality)
This setup does not require the ESPHome add-on to be pre-installed and uses Bluetooth to connect the device to Home Assistant. While this method offers several benefits, it provides access to only a limited set of parameters upon installation: motion and occupancy. If you prefer more control over the sensor and wish to use a Wi-Fi connection, we recommend following the Advanced Setup (todo: link).
-
Connect the sensor to power using one of the USB connectors. Do not supply power to both USB connectors at the same time.


-
Wait a few seconds for the device to be automatically discovered then click on "Notifications";
-
Click on "Check it out" link;
-
Click on "ADD" then "SUBMIT" buttons;


-
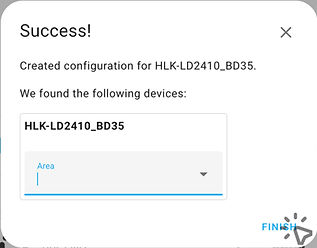
Select device's area and/or click on "FINISH";
-
A list of connected Hi-Link devices should appear;
-
Locate the newly added sensor in the list and click on it;
-
Congratulations! You successfully added the motion sensor. Now you can automate your space!


Swivel Joint Adjustment
-
Loosen the joint screw with a Phillips screwdriver to unlock the joint;
-
Adjust the joint as needed;
-
Tighten the screw to lock the joint.
Viewing more parameters (optional)
-
Most parameters are disabled by default.
To view them, click on "Disabled entities" at the bottom. Then, enable the desired parameters in the configuration.

