
First impression
Upon installation, your setup should look similar to the screenshot:
Please don’t feel overwhelmed by the number of parameters this sensor provides. Most automations require only a few of them.


Turning lights on and off
One of the most basic and common uses of a radar presence sensor is turning lights on and off.
For this scenario, you need only one parameter — Presence.
-
Turn lights ON when Presence becomes occupied
-
Turn lights OFF when Presence becomes not occupied
That’s it.
Preventing lights from flickering on and off
A common scenario is entering and leaving a room briefly (for example, stepping out for a moment). In such cases, you may not want the lights to turn off immediately and then flicker back on.
To avoid this, use the Timeout/Presence Hold parameter.
-
Timeout defines how long the sensor waits before switching Presence from occupied to not occupied after detection stops.
-
The default value is 5 seconds.
Example:
If you set Timeout to 30 seconds, the Presence state will change to not occupied only after 30 seconds of no detection. This helps keep lights stable and prevents frequent on/off switching.

Limiting detection distance
(avoiding false triggers)

Another common use case is triggering the sensor only when someone is within a specific distance.
The LD2410 series has a maximum detection range of 6 meters (20 feet). The sensor divides this range into distance zones called gates (Gate #0 through Gate #8).
The size of each gate is defined by the Distance Resolution parameter:
-
Default value: 0.75 m
This means:
-
Gate #1 is 0.75 m
-
Gate #2 is 1.5 m
-
Gate #3 is 2.25 m
-
and so on


Example: restroom or small closet
Imagine a restroom or small closet built with drywall and located near a hallway or another walkable area. The room is 2×2 meters, and you want the lights to turn on only when someone is inside the room. Radar waves can penetrate drywall, so the sensor may detect people walking outside the room, causing false triggers (detection range is 6 meters).
To prevent this, you can limit the detection range:
Set Max Move Distance Gate to 3
Set Max Still Distance Gate to 3
With the default distance resolution (0.75m):
0.75 m × 3 = 2.25 meters (≈7.4 feet)
This means the sensor will ignore movement and presence beyond 2.25 meters, helping eliminate false positives from outside the room.
Auto-calibration (recommended before manual tuning)
This guide applies to firmware v1.3 or newer. If your firmware is older, please update it by following the Advanced setup guide.
Auto-Calibration Guide
If the sensor is too sensitive, not sensitive enough, or you would like it to ignore background movement from household appliances, ceiling fans, pets, or other sources, you can run the Auto-Calibration process from the Home Assistant UI.
1. In Home Assistant, go to Settings → Devices & Services → ESPHome and open your radar sensor device.
2. Perform a factory reset by clicking "03: Radar - Factory Reset" in the Controls section. This ensures that the radar starts from a known configuration and helps avoid issues caused by previous settings.

3. Set the desired Auto-Calibration Duration (1–10 minutes). The default value is 1 minute.

4. Set the desired noise Margin (5%–15%). This margin will be added to each move and still threshold after calibration is complete. The default value is 5%.

5. Turn on any equipment that you want the sensor to ignore and leave any pets in the room. Then leave the room yourself and enable "010: Radar - Auto Calibration" in the Configuration section. You may find it more convenient to start the calibration remotely from your phone.

6. Once calibration starts, the radar will enter Engineering Mode and begin collecting environmental move and still energy values. The current progress and remaining time will be displayed in the Diagnostic section.

7. When calibration is complete, Engineering Mode will turn off automatically. Observe the sensor's performance. If you still experience false detections or the sensor is not sensitive enough, increase the calibration duration and/or noise margin and run the calibration again. Repeat as needed until the sensor performs as desired.
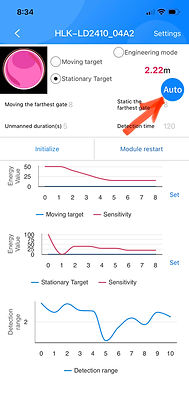
Auto-calibration with HLKRadarTool
(less convenient)
Auto-calibration using the HLKRadarTool mobile app:
-
Install HLKRadarTool on your phone.
-
Connect to the sensor via Bluetooth.
-
Leave the room and keep everything as it normally is if you want those objects to be ignored by the radar.
-
Press the blue button labeled “Auto”.
-
The auto-calibration process will start in 10 seconds and will take about 60 seconds to complete. The process is finished when the yellow indicator changes color.
Engineering Mode
(advanced control)
Sometimes you may notice the sensor triggering too often or not being sensitive enough. In such cases, you can fine-tune its behavior using Engineering Mode.
⚠️ Engineering Mode outputs large amounts of UART data and should only be used temporarily. It may overload the UART bus and cause sensors to show “unknown” values.
Engineering Mode basics
After enabling Engineering Mode, the sensor will start reporting Moving and Still Energy values.
Each value ranges from 0 to 100:
-
Higher values mean a stronger movement or presence signal
-
Lower values mean weaker or no detection
Gates and energy values
As mentioned earlier, the maximum detection range (6 meters) is divided into zones called Gates, from Gate #0 to Gate #8.
For each gate, the sensor reports separate moving and still energy values.
By adjusting the Move Threshold and Still Threshold sliders, you control how strong a signal must be before the sensor reports movement or presence.
The sensor will only trigger detection if the measured energy value exceeds the threshold set for that specific gate.
⚠️ Although these thresholds provide advanced control, we do not recommend spending too much time tuning them unless you have a specific issue to solve.


Important things to keep in mind
Depending on the sensor’s positioning, radar waves can penetrate walls, ceilings, and floors, so detections may come from sources you don’t immediately expect. For example:
-
People moving behind a wall or in a neighboring apartment
-
Movement upstairs or downstairs
-
Running water in a toilet
-
Ventilation or ceiling fans
-
Moving curtains or hanging objects
These are not necessarily sensor faults, but normal behavior for radar-based detection.