
Firmware Update Recommended
Some devices may have an earlier firmware version installed.
For the latest features and fixes, we recommend updating the firmware before starting the setup.
Update Requirements
Computer
Required
USB Cable
Data cable required
Browser
Google Chrome or Microsoft Edge
Updating the factory firmware may remove saved Wi-Fi credentials
After the update, return to this page and follow the setup steps below
Device Setup
Follow the steps below to setup a device with preflashed firmware
Power the device
-
Connect the device to any USB power supply
-
Within a minute, the device will start a Wi-Fi hotspot named "Akamatis Presence Sensor Hotspot" or "Akamatis Smart Device [random suffix]" (no password required)
Connect to Akamatis hotspot
-
Open the Wi-Fi settings on your phone or computer
-
Look for a network name with an "Akamatis ..." prefix
-
Tap or click that name
Grant Wi-Fi credentials
-
After connecting to the Akamatis hotspot, open a browser and go to 192.168.4.1
-
Enter your Wi-Fi credentials (SSID and password)
-
The device supports 2.4 GHz Wi-Fi only
Wait for the device to connect
-
After you submit your Wi-Fi information, the Akamatis hotspot will disappear
-
Your phone or computer should automatically reconnect to your normal Wi-Fi network in less than a minute
-
If it does not reconnect automatically, open your Wi-Fi setting and reconnect manually
Add the device to Home Assistant
-
In Home Assistant, go to Settings → Devices & Services. A newly discovered device will appear with a name starting with "Akamatis Presence Sensor" or "Akamatis Smart Device"
-
Click Add, then set your preferred device name and location.
You may ignore sensors that are auto-discovered via Bluetooth (BLE)
Confirm that setup is complete
-
The device should now appear under Settings → Devices & Services → ESPHome
-
Open the device and confirm that its sensors and controls are available
-
That's it - your Akamatis device is ready to use!
Prepare your HPS v4PL for mounting
Remove the protective PIR cap and assemble the adjustable wall mount before placing the sensor.

STEP 1
Remove the front holder
Release the side tab with a fingernail, then pull the holder away from the front.

STEP 2
Remove the protective cap
Remove and discard the protective cap to expose the PIR lens.

STEP 3
Attach the holder to the wall mount
Slide the holder onto the adjustable wall mount.
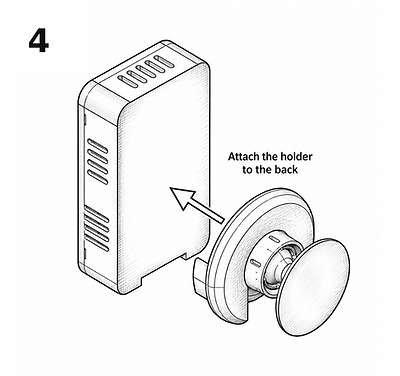
STEP 4
Position the holder at the back
Bring the assembled holder to the back of the sensor.
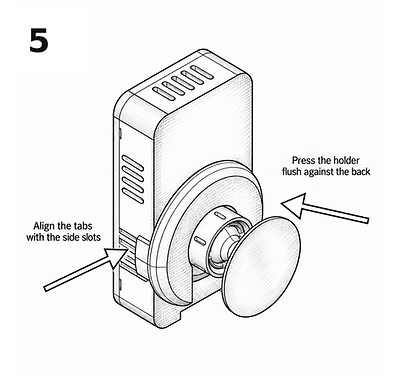
STEP 5
Press the holder into place
Align its tabs with the side slots and press the holder flush against the back.
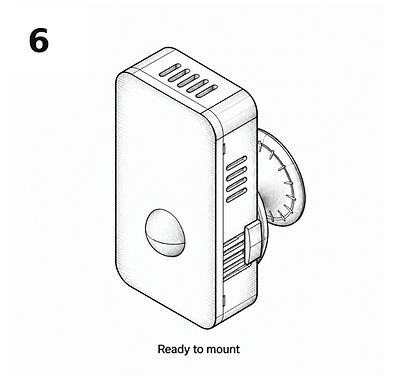
STEP 6
Ready to mount
The sensor and adjustable mount are assembled and ready to position.
Recommended post-installation steps
Perform a factory reset of the radar sensor from the Home Assistant interface after completing the initial setup.
This resets only the radar module (not the ESP32) and helps prevent issues caused by accidental radar misconfiguration.

If you experience any issues, please check our Troubleshooting section or contact us at support@akamatis.com.
Automations you can try
Continue setting up your device
Explore advanced configuration, entity references, detection zones, and sensor-specific guides.